Mushroom farming at home is one of the fastest-growing agricultural trends in India — and for good reason. With minimal space, low investment, and high demand, it offers a real opportunity to generate income while growing nutritious food. Whether you are a homemaker, student, or aspiring agripreneur, this guide will walk you through everything you need to know to start mushroom farming at home in India in 2026.
Why Mushroom Farming is Perfect for Indian Homes in 2026
India is witnessing a mushroom farming revolution. The domestic mushroom market is growing at over 20% annually, driven by rising health consciousness and demand for protein-rich, plant-based food. Here is why home mushroom farming makes perfect sense right now:
Low space requirement: You can grow mushrooms in as little as 50-100 sq. ft. — a spare room, terrace, or balcony works well.
Quick returns: Oyster mushrooms can be harvested in just 25-30 days from spawn inoculation.
High demand: Restaurants, supermarkets, and health stores in every Indian city are actively sourcing fresh mushrooms.
Low investment: You can start with as little as Rs. 5,000-10,000 and scale up gradually.
Year-round crop: Unlike seasonal vegetables, mushrooms can be grown throughout the year with controlled conditions.
Step 1: Choose the Right Mushroom Variety
For beginners in India, Oyster Mushrooms (Pleurotus spp.) are the best starting point. They are forgiving, fast-growing, and extremely popular in the market. Other beginner-friendly varieties include:
Button Mushrooms (Agaricus bisporus): High demand, suitable for cooler climates like Himachal Pradesh and parts of Uttarakhand.
Milky Mushrooms (Calocybe indica): Best for tropical regions like South India, thriving in warm conditions.
Shiitake Mushrooms: Premium variety with excellent market price, suited to controlled environment farming.
Step 2: Source Quality Mushroom Spawn
The quality of your mushroom spawn determines everything — your yield, your contamination rate, and your profitability. Poor-quality spawn is the number one reason beginners fail at mushroom farming. Always source certified, lab-grade mushroom spawn from trusted suppliers like Milkyway Mushroom, who produce spawn under sterile conditions with verified genetics.
When choosing spawn, look for:
Fresh, mold-free appearance (white, bright, no black patches)
Strong, earthy mycelium smell (not sour or ammonia-like)
Produced within the last 15-20 days for maximum viability
Strain-specific certification for the variety you intend to grow
Step 3: Prepare Your Growing Substrate
Mushrooms do not grow in soil — they grow on substrate, which is a nutrient-rich growing medium. The right substrate depends on the mushroom variety:
Oyster Mushrooms: Paddy straw, wheat straw, sugarcane bagasse, or cotton waste — all readily available across India.
Button Mushrooms: Composted wheat straw mixed with poultry manure (Phase II compost).
Shiitake: Hardwood sawdust or oak wood logs.
Substrate must be pasteurized or sterilized before inoculation to kill competing organisms and prevent contamination. This is typically done by boiling, steam pasteurization, or hot water treatment.
Step 4: Inoculate and Incubate
Once your substrate is pasteurized and cooled to room temperature (25-30°C), mix in your mushroom spawn at a rate of 2-3% of the substrate weight. Pack the inoculated substrate into polypropylene bags, poke small ventilation holes, and place them in a dark, clean room. During the incubation phase (10-20 days for oyster mushrooms), maintain:
Temperature: 25-30°C for most varieties
Humidity: 85-90%
Darkness: No direct light during spawn run
Ventilation: Minimal but adequate air exchange
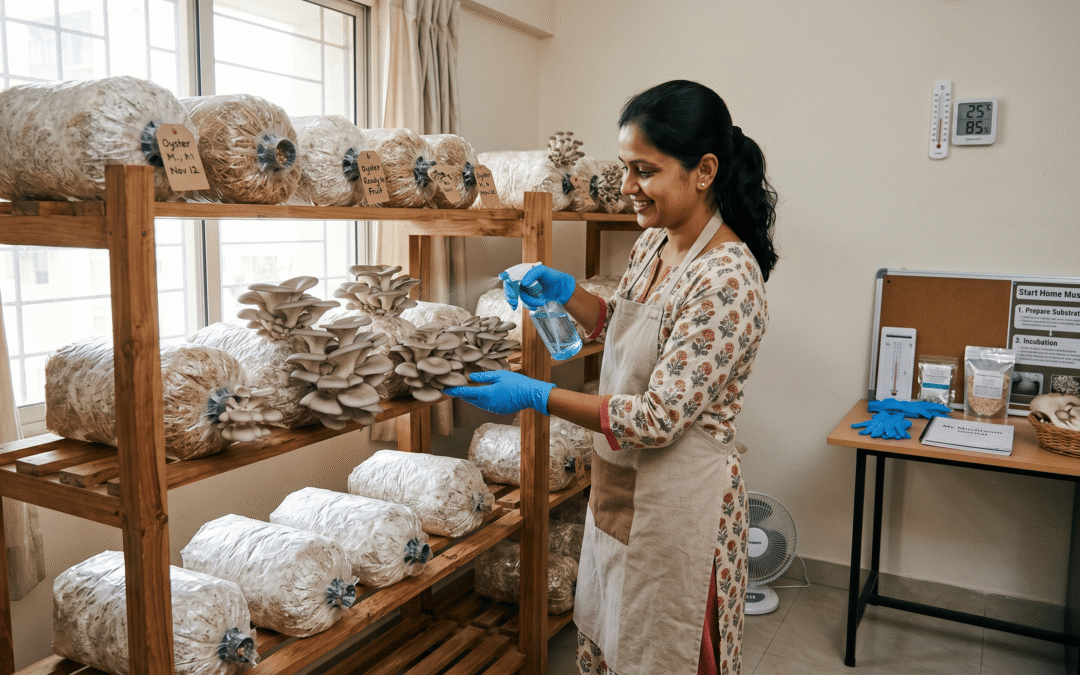
Step 5: Fruiting — Where the Magic Happens
Once the substrate bag is fully colonized with white mycelium, it is time to trigger fruiting. Cut small slits or holes in the bags to allow pins (tiny mushroom buds) to emerge. Move the bags to a fruiting room with these conditions:
Temperature: 18-25°C (slightly cooler than incubation)
Humidity: 90-95% (mist the bags 2-3 times daily)
Light: Indirect diffused light for 8-12 hours daily
Fresh air exchange: Ventilate the room for at least 30 minutes every few hours to prevent CO2 buildup
Pins will appear within 5-7 days and be ready for harvest in another 3-5 days. Each bag can yield 2-4 flushes (harvests) before it is exhausted.
Step 6: Harvest and Sell Your Mushrooms
Harvest mushrooms just before the caps fully open and flatten out. Twist and pull gently or cut at the base. For oyster mushrooms, expect 300-500g per bag per flush. After harvest, clean the bag surface, continue misting, and wait for the next flush.
Selling channels for fresh mushrooms in India:
Local sabzi mandis and vegetable vendors
Restaurants and hotels (premium prices for fresh, exotic mushrooms)
Health food stores and organic markets
Online platforms: Swiggy Instamart, Blinkit, JioMart
Direct WhatsApp-based community sales
Investment and Profit Potential for Home Mushroom Farming
Here is a realistic breakdown for a beginner setup of 100 bags (oyster mushrooms):
Mushroom Spawn (100 bags x Rs. 20): Rs. 2,000
Substrate (paddy straw, PP bags): Rs. 1,500
Basic equipment (sprayer, hygrometer, gloves): Rs. 1,500
Total Investment: Rs. 5,000
Expected Yield: 100 bags x 400g average x 3 flushes = 120 kg of mushrooms
Selling Price: Rs. 150-200/kg (retail) = Rs. 18,000 – 24,000 revenue
Net Profit on First Batch: Rs. 13,000 – 19,000
Top 5 Mistakes Beginners Make (And How to Avoid Them)
Using low-quality or old spawn: Always buy fresh, certified spawn from a reliable source. The genetics of your spawn directly determines yield quality.
Skipping substrate sterilization: This leads to contamination by green mold (Trichoderma), which kills the entire batch.
Overwatering: Excess moisture invites bacterial blotch and rot. Mist lightly to maintain humidity without waterlogging.
Poor ventilation: High CO2 levels cause long-stemmed, abnormal mushrooms. Fresh air exchange is non-negotiable.
Not maintaining temperature: Fluctuating temperatures stress the mycelium and reduce yields drastically.
Frequently Asked Questions About Home Mushroom Farming in India
Can I grow mushrooms in a small apartment in India? Yes. Oyster mushrooms can be grown in a balcony, bathroom, or any humid corner with indirect light and good air circulation. Many successful urban mushroom farmers operate out of 50-100 sq. ft. spaces.
How long does it take to see the first harvest? From spawn inoculation to first harvest, oyster mushrooms take approximately 30-40 days under good conditions.
Where can I buy mushroom spawn in India? You can order certified, high-yield mushroom spawn directly from Milkyway Mushroom (mspawn.in) with pan-India delivery available.
Is mushroom farming profitable in India? Absolutely. With proper technique and good spawn, a small 100-bag setup can generate Rs. 15,000-20,000 per batch with just 30-40 days of crop cycle.
Start Your Mushroom Farming Journey Today with Milkyway Mushroom
The hardest part of mushroom farming is taking the first step. Once you see your first flush of fresh oyster mushrooms growing right in your home, there is no going back. Milkyway Mushroom provides lab-grade, certified mushroom spawn with expert support to help beginners and experienced growers alike succeed. Our spawn is produced under sterile conditions with verified genetics, ensuring high yield and low contamination rates from day one.
Ready to begin? Browse our range of mushroom spawn varieties at mspawn.in and take the first step toward building your own profitable mushroom micro-farm in 2026.